Monday, September 30, 2013

A Winner ~ A Finish (ALYOF) ~ and Another GIveaway!!

Firstly,my apologies for not having this post up yesterday.

The Winner of the two Kanzashi Flower templates is...

Barbara who said "always ready to try something new,thanks for the chance"  Congratulations Barbara,they will be on the way to you by Wednesday afternoon!  Thank you to everyone who left a comment,and you will all have another chance to win something again,at the end of this post!!

My finish for September ~ ALYOF


The Goal for this month was to pick a design from the Doodle Stitches book and try my hand at some embroidery.  Since I had not yet sent anything to my nephew for little Axton Rane,I decided now was the time.  So the design I chose was a little teddy bear.


Somewhere I had acquired a skein of variegated blue floss,so that is what was used for this first teddy bear.  He is a little wonky,but very cute and not half bad for a first attempt at embroidery!  I like him so much that I decided to do two more,one in brown and one black.  I hope to have those done soon.

August was my blog anniversary,but it slipped right by,as well as this month also.  Which led to the decision to celebrate a tad late :)  So...

This weeks Giveaway is...


Yes,it is another item from Fabric Fest!  Everyone received one of these little "Make & Take kits" with all of our "Swag".  Since I was too busy with my classes (didn't want to miss a thing) this kit came home with me,untouched.  What is in it?  Let me tell you,what you will win if you are the lucky commenter :)

  • There are 5 projects included in this kit:
  • UFO to Go
  • Needle Nook
  • Pincushion
  • Scissor Holder
  • Laminate Box Bag
Sound like something you might be interested in winning???  If so,leave me a comment on...
What your favorite thing about Fall is.  My favorite thing about Fall is,all the different shades of beautiful color on the Aspens,crisp mornings and evenings,the start to baking season,the list goes on...

Linking up to:

ALYOF September party

Sew Darn Crafty Linky

Free motion by the River (Tuesday)


Wednesday, September 25, 2013

How to Pickle Beets

Do you like pickled beets,well if you do then todays preserving/canning recipe is right up your alley!  Because today we will be pickling beets.

When Choosing beets,look for ones that are firm to the touch with smooth skins and crisp,fresh looking greens.


What you will need for this recipe:


  • 3 pounds of whole beets (around 2 inches in diameter)
  • 2 cups vinegar
  • 1 cup water
  • 1/2 cup sugar
  • 3 inches of stick cinnamon
  • 1 teaspoon whole allspice
  • 6 whole cloves 
  • small piece of kitchen string
  • 6 inch square of cheesecloth (doubled)
  • 6  half pint canning jars,lids,rings
  • canning/preserving utensils
  • stockpot
  • saucepan


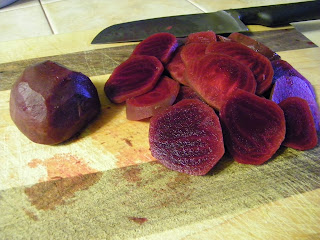
Wash your beets and cut off the stems (you can leave about an inch of the stem,I chose not to) and the root end.  Do Not peel.  In a stockpot cook beets in enough boiling,lightly salted water to cover,for about 25 minutes or until tender;drain.  Cool beets slightly;trim off stems.


Slip off and discard the skins.


  In a medium saucepan,combine vinegar,water,and sugar.  For your spice bag,place cinnamon,allspice,and cloves in the center of the cheesecloth.  Bring up the corners;tie closed with the kitchen string,and add to the saucepan.  Bring to boiling,stirring to dissolve sugar;reduce heat.  Simmer uncovered for 5 minutes.  Remove from heat and discard spice bag.


While the liquid simmers,prepare the beets for the jars.  Here you can either quarter or slice your beets.  I have chosen to slice mine,in 1/4 inch widths.


Pack your beets into your hot sterilized jars leaving 1/2 inch headspace.  Never mind that I actually have 7 pint size jars here.  I had a lot more beets to can,so adjusted the recipe accordingly.


Pour the hot vinegar mixture over beets,maintaining the 1/2 inch headspace.


Use your bubble remover to remove any air bubbles from the jars,wipe the rims,adjust lids,and screw on the rings.


Place your jars into the water bath canner and bring to a boil.  When water comes to a boil,process for the recommended time for your altitude.  (refer to the Ball Blue Book of Canning,or you could google it)


When the processing time has elapsed,remove the jars to a draft free place to cool.  Remember to check the seals on each jar.  For the best taste wait for at least 24 hours before trying your beets.  Enjoy!


Sunday, September 22, 2013

My favorite time of year...& a little Giveaway

Today was the first day of fall!  Yes I am excited about that,as it is my favorite time of year :)  Even though it has rained all afternoon and evening.


This photo is from last year,as the aspens are just barely starting to turn color now.  In a few short weeks we will take a weekend and enjoy all of the beautiful fall color!


This evening I baked the first pie pumpkin of the season :)


Yesterday after the FM Mr. P and I got our craft on,and made up some pumpkins!  We were both super happy with how they turned out!  There are two different kinds in the photo.  The two top pumpkins are from this tutorial the canning ring pumpkin is from this tutorial where she calls them jar "lids" important if you are going to be making one or more of your own.  As the "lids"will Not work,you need the Rings.


Here are the three canning jar ring pumpkins that we made,Mr. P painted them orange.  Since I didn't want to buy anything we got creative and used things we had on hand.  For the stems we cut up one of my sunflower stalks that we recently pulled up.  It had already mostly dried out,so it worked great!  To take up the extra space around the stem,I used some very thin cardboard,folded and hot glued around the stem.  To hide the cardboard,I used (top left) the dried roots from the sunflower stalk (top right) dried weeds (bottom) yarn bits and pieces.

The leaves are from my craft supplies,normally used for my pinecone ornaments.  We have more projects in the works,when they are finished I will share them too.


I wanted to post the photo of Jamie and I at Fabric Fest,but I must have accidently deleted it :(  So here is a photo of Jamie working on her Big Stitch project instead :)


Here are a few of the goodies she brought and gave to me at Fabric Fest!!  Thank You :0)


While we were there,she purchased and gave me some Clover Kanzashi Flower templates!!  As you can see I have been making a few! I thought it would be nice to share some with you,so,Would you like to have the two in the photo?  If so,just let me know in your comment!  (make sure I have a way to contact you if you win)

Have a great first week of Fall :)

Wednesday, September 18, 2013

Pina Colada Freezer Jam

Are you ready to can/preserve some more veggies from the garden?  Today we are going to be making some jam reminiscent of a cocktail drink called Pina Colada!  You are going to be surprised by one of the ingredients,but don't let that make you shy away from trying out this recipe.  I assure you,that this jam is so good you could eat it right out of the container with a spoon!  (at least,Mr. P did!)

Pina Colada Jam:


Supplies from the cupboard/pantry needed to make this recipe.


  • Large stock pot
  • Mason jars (or plastic freezer containers) 8 oz
  • wooden or plastic spoon 
  • ladle
  • grater or food processor 
  • clean cloth (for wiping the rims of the containers)
  • 2 three ounce packages of Pineapple gelatin
  • 1 teaspoon of Rum extract
  • 1/4 cup lime juice
  • 1 20 oz can of crushed pineapple (do not discard the juice)
  • 6 cups grated Zucchini (use a grater or food processor)
  • 6 cups sugar


Add to your stock pot,the grated zucchini,lime juice,sugar,pineapple including the juice.  Stir to incorporate/mix all of the ingredients together.


Bring to a boil.  Stirring constantly,boil for 10 minutes.


Remove from the heat (I just turned off the gas burner).  Add the 1 teaspoon of rum extract,and stir to incorporate.


Add the two packages of pineapple gelatin,and stir until it has all dissolved.  Allow to cool slightly,especially if you will be using plastic freezer containers.


These are the containers I will be using for my jam,because they stack nicely in the freezer.


Move your stock pot to a location with plenty of room to work.  The kitchen table works great for me.


Now we are ready to start filling the containers.  Make sure that you leave a 1/2 inch headspace at the top of your containers.


After filling all the containers,set them aside to completely cool before placing the lids on them.


Once the jam is cooled off wipe the rims of your containers with the(damp) clean cloth before placeing the lids on your containers,label them and place them in the freezer.  I left one container out at Mr. P's request :)

The jam wil keep for up to one month in the refrigerator,or up to one year in the freezer.  Hope you give this one a try,you will be surprised at how unexpectedly delicious it is!


Monday, September 16, 2013

Fabric Fest Swag

In one of the emails from the coordinator for Fabric Fest,there was a hint about Swag...


Upon arriving and registering,each person received a bag like this,stuffed with goodies,brochures,magazines...


As well as all these sweet goodies!  At each meal/place on the tables there were decorative squares of paper and or fabric with sayings on them!  (three of mine are in the photo)


Tuesday morning my class was with Sue Daley,she taught us how to make hexagons. (1/2")  We cut the pieces,glued them to the papers,and then sewed them.  I am a slow hand sewer,and was only able to finish one flower during the class.


The afternoon class was Big Stitch,where we worked on pillows.  I will post photos when mine is finished.


Wednesday morning I took a class on using up scraps,this is the basket/box we made in class.  We sewed four 6 inch pieces together (I alternated the pieces) for the outside and four for the inside,then attached the bottom squares.  It turned out pretty cute!


The afternoon class I chose to take on Wednesday was Lori Holt's Candy Beads Quilt ! Using her circle rulers.  BTW sometime in the near future I will be giving away a set of these!


Here are the circles I was able to finish during class.  There are 60 circles total,so I need to make another 28,fourteen each of the medium and large size.


Lori Holt and me :))))  Standing in front of her finished Candy Beads Quilt.  Although you can not tell from the photo,the background color is a pale aqua.

Quilts from the Fashion Show Wednesday night:


These are not all of them,just the ones I was able to get a good photo of.  I did not get any of the clothing,because everyone walked so fast!