
 |
| For this project you will need... 20 charm (5x5)squares 1/3 yard fabric for inner border 2/3 yard for outer border/binding 1 yard backing fabric 1 yard batting Lil Twister template |
 |
| Lay out your squares in a 6x4 pattern. |
 |
| Sew your squares together in rows. You can either sew them from one side to the other,or from top to bottom. |
 |
| Here are all my rows sewn together. |
 |
| Take each row to the ironing board and press your seams open. |
 |
| After pressing open all of your seams sew your rows to each other,as before either side to side or top to bottom. |
 |
| Next you will need to press all of your seams open again. |
 |
| Here all of the strips/rows are sewn together to make 1 large block/mini quilt. |
 |
| Next you will need to cut your inner border fabric. Cut 3 inch strips the width of your fabric. |
 |
| Sew the strips to your large block/mini quilt of fabric on all sides. |
 |
| Press open your seams. |
 |
| At this point your large block/mini quilt should look like this. |
 |
| Now take your Lil Twister template and line up the black lines on it with the seams on your mini quilt. As shown above. |
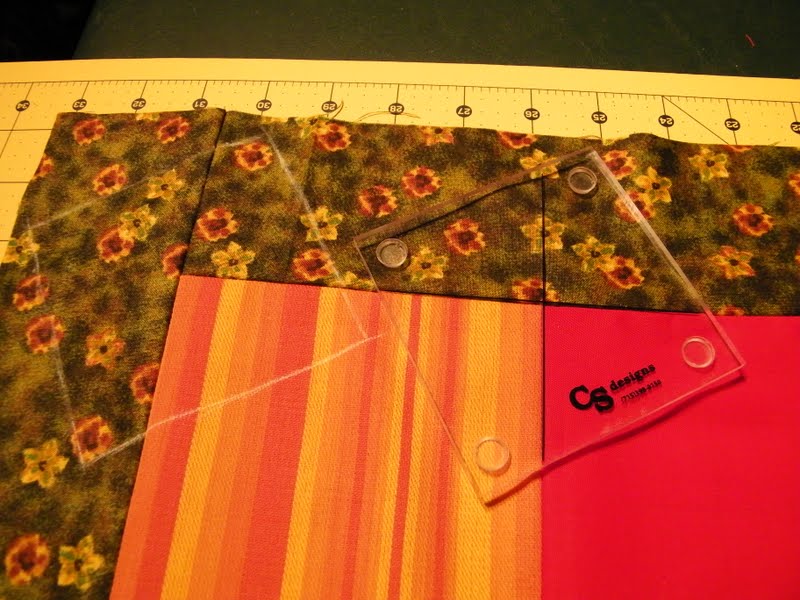 |
| Here you can see that I have traced out the template with white chalk. The instructions say to cut out your squares with a Rotary cutter. But I am not that great with the Rotary cutter unless it is a straight line. So I traced out the template squares and then cut them out with my scissors. |
 |
| Here is another picture of the traced templates. |
 |
| The first row of squares has been cut out and laid out in the same way they were cut. |
 |
| Now all of the squares have been cut out and put back together. If you look at the second square up on the right side bottom of my quilt you can see that I have turned one square the Wrong Way! Make sure that your layout is correct before sewing your squares back together! :) |
 |
| In this photo my first row has been sewed together. You will repeat the steps from above. Sewing your squares together in rows and pressing your seams open as you go. |
 |
| All of my squares cut out. At this point your original block/mini quilt will resemble a large piece of Swiss cheese! Don't throw this in the trash! Cut out all of those 2 1/2 inch squares you see there. You Can use them in the border,or use them for another project. (I chose to use some of them on the back and saved some for another project.) |
 |
| This is what I had left,as I took the small wedge shaped fabric scraps and threw them in my scrap bin. |
 |
| All the squares have now been sewed back together here. Hopefully minus my mistake on your version :) |
 |
| Here is a photo of the back side with all the seams nicely pressed open. |
 |
| Now take your 2/3 piece of fabric and cut 3 inch strips to form the outer border. You can use some or all of your 2 1/2 inch squares for this,or just use the strips. If using the squares sew them together to make the strips for the outer border. Sew them to the mini quilt top as before,with the 3 inch strips,on all four sides. |
 |
| Press the seams open. |
 |
| There you go! You now have a Lil Twister Mini Quilt top! |
 |
| Here is a picture taken outside on my clothes line. You can now make a quilt sandwich with your quilt top, batting and backing. quilt as desired and then bind together. |
Cut, sew, sew, cut, press, oh my! I still think the 'mistake' blends in so well it doesn't even matter.
ReplyDeleteLove your 'don't waste the fabric' philosophy.
This is awesome! I have one of those twister rulers and I've been too scared to use it, but your tutorial makes it look easy.
ReplyDeleteBy the way, I made real Peach Salsa yesterday - the edible kind, I mean. Come on over to my blog and have a look.
http://plainjane21.blogspot.com
Adorable twister with peach salsa colors! Thanks for sharing. I really like using these rulers.
ReplyDeleteThat's pretty cool. I never knew such a ruler/template existed. Thanks, for helping me out with my comment issue. I was totally close but just didn't know what I was looking for!! :)
ReplyDeleteThanks for the tutorial! I'm going to have to look for that ruler.
ReplyDeleteLove the tutorial! I am glad I am not the only one that traced around the template and cut out with scissors!
ReplyDeleteWell hello CeLynn - love your quilt and details of your tutorial; you make it look so easy. Inspired me! Blessings Terri www.morningdewdrops.typepad.com
ReplyDeleteYou got me there! I thought you meant peach salsa to eat!! Guess you know what I was thinking about this evening :-) I had never heard of this cool ruler before - thanks for sharing and joining the linky party at RocknQuilts.blogspot.com!
ReplyDelete