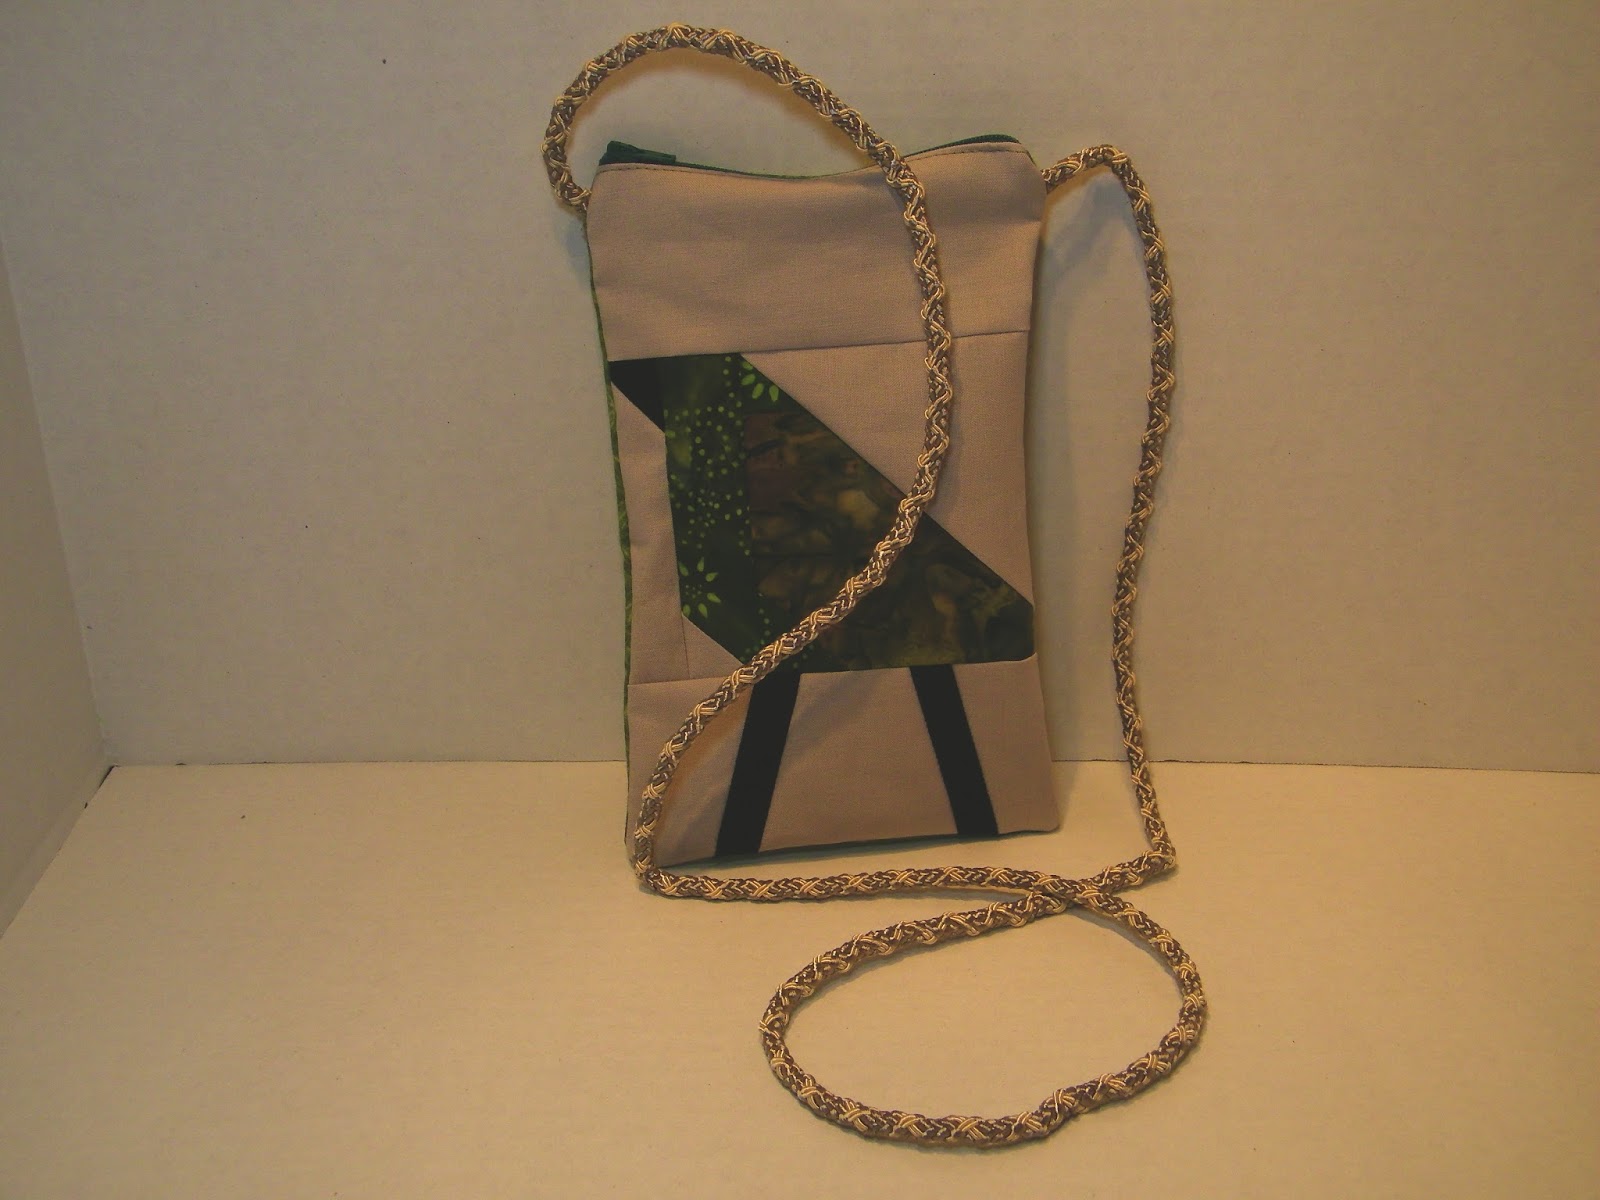
Since my Soft and Stable did not ship out until yesterday (really?),I have been working on some other new patterns purchased recently.
Remember the strips of batik fabric from last week,well this is what they became. The pattern is from indygo junction by,Amy Barickman (IJ909). It is called Cinched Patchwork Satchel. There are directions for making the bag from re-purposed menswear,or batiks. Having batiks on hand,that was the obvious choice for me!
The pattern called for attaching the handles with grommets,but I mis-understood the directions,so had to just sew my handles on and leave the grommets off. There are pockets on the front and back insides of the bag. I love how roomy this bag is and am really happy with how it turned out,even with the mistake.
How about the two extra birdie blocks I made for July? This simple cross body bag is the "plans" I mentioned in that post . For the second one I will change up a few things,like adding zipper tabs,and using something other than cording for the strap/handle. Adding a second zip was a thought,but then I would have to cut up the birdie.
Wednesday, August 14, 2013
Sunday, August 11, 2013
Preparing Green Beans for Freezing
Today there were things to be done in the kitchen so,instead of sewing I spent my free time preserving some of the goodness from the garden. For a while now I have been toying with the idea of doing a series on preserving/canning/freezing...
Here is the question,would you peeps be interested in something like that? Please let me know in the form of comments if that is something you would like to read/learn about. I am not an expert by any means,but,am happy to share the knowledge acquired from my experiences! With that in mind here is a sample...
How to prepare Green beans for Freezing:
Blanching (scalding in boiling water for a short timed interval) partially cooks,sets the bright green color,stops enzyme actions that can cause loss of color,flavor,and texture
What you will need:
First you will need the green beans,these are from our garden,there is just under two and a half pounds. I have already washed them,snapped off the ends,and also snapped them into bite size pieces.(you can also cut them,but I prefer to just snap them).
So,wash your beans,and either cut or snap them to the desired size.
If you live at a high altitude like we do here,you will want to put your water on to boil before preparing your beans,as it will take a while to reach the boiling point. You should have 1 gallon of water per pound of beans. (I had to do mine in two batches,as my pot was not large enough to accommodate the correct amount of water and beans)
Bring your water to a rolling boil.
While waiting for your water to boil prepare your Ice water bath. You can use a large bowl or another large pot. Or,you can use the kitchen sink. I prefer to do the latter,as there is plenty of room to work,and the sink will hold a lot of beans. Which is great if you are preparing a large amount of beans.
The amount of blanching time will depend on the size of your prepared beans. For small,or bite size pieces you will need to blanch for two (2) minutes ~ for medium size pieces,you will need to blanch for three (3) minutes ~ for large size pieces,you will need to blanch for,four (4) minutes.
As you can see I am not using the metal steamer basket,because I do not have one. So I have to use a slotted utensil to remove the beans from the pot. Which I would Not recommend if you have little ones!
Once you have Carefully added the beans to the pot,place the lid back on,so it can return to a boil as quickly as possible. Once it has returned to a boil,start your timer for the correct time,for the size of your beans.
After the blanching time has elapsed,Carefully remove the beans from the boiling water and immediately plunge them into the waiting Ice water. Be sure to cool the beans in the ice water for the Same amount of time as you Blanched them for.
When the beans are done cooling in the ice water remove them to a towel,or place where they can air dry. In the photo the beans are in a pile,you need to spread them out in a single layer to air dry.
While waiting for the beans to dry,prepare your freezer bags. I am using bags that you can remove the air from,but regular freezer bags will work just fine.
When your beans have air dried place them into the freezer bags,in meal size portions that are appropriate for your family. For Mr. P and I that is a half cup serving,or one (1) cup of beans per bag.
Thats seven (7) servings of green beans for us to enjoy this winter!
The sources I consulted for this post are as follows:
National Center for Home Food Preservation
How to Freeze Fresh Green Beans
You can find a lot of useful information at the first link,the second one is just how to freeze green beans,but there is also a link to a recipe for lemony green beans there.
Enjoy your week!
Here is the question,would you peeps be interested in something like that? Please let me know in the form of comments if that is something you would like to read/learn about. I am not an expert by any means,but,am happy to share the knowledge acquired from my experiences! With that in mind here is a sample...
How to prepare Green beans for Freezing:
Blanching (scalding in boiling water for a short timed interval) partially cooks,sets the bright green color,stops enzyme actions that can cause loss of color,flavor,and texture
What you will need:
- Green Beans (of course)
- A large pot,for Blanching the beans
- Ice,I just bought a small bag at the connivence store
- Freezer bags
- a metal steamer basket,(you can do without this,but it is Much easier if you use one)
First you will need the green beans,these are from our garden,there is just under two and a half pounds. I have already washed them,snapped off the ends,and also snapped them into bite size pieces.(you can also cut them,but I prefer to just snap them).
So,wash your beans,and either cut or snap them to the desired size.
If you live at a high altitude like we do here,you will want to put your water on to boil before preparing your beans,as it will take a while to reach the boiling point. You should have 1 gallon of water per pound of beans. (I had to do mine in two batches,as my pot was not large enough to accommodate the correct amount of water and beans)
Bring your water to a rolling boil.
While waiting for your water to boil prepare your Ice water bath. You can use a large bowl or another large pot. Or,you can use the kitchen sink. I prefer to do the latter,as there is plenty of room to work,and the sink will hold a lot of beans. Which is great if you are preparing a large amount of beans.
The amount of blanching time will depend on the size of your prepared beans. For small,or bite size pieces you will need to blanch for two (2) minutes ~ for medium size pieces,you will need to blanch for three (3) minutes ~ for large size pieces,you will need to blanch for,four (4) minutes.
As you can see I am not using the metal steamer basket,because I do not have one. So I have to use a slotted utensil to remove the beans from the pot. Which I would Not recommend if you have little ones!
Once you have Carefully added the beans to the pot,place the lid back on,so it can return to a boil as quickly as possible. Once it has returned to a boil,start your timer for the correct time,for the size of your beans.
After the blanching time has elapsed,Carefully remove the beans from the boiling water and immediately plunge them into the waiting Ice water. Be sure to cool the beans in the ice water for the Same amount of time as you Blanched them for.
When the beans are done cooling in the ice water remove them to a towel,or place where they can air dry. In the photo the beans are in a pile,you need to spread them out in a single layer to air dry.
While waiting for the beans to dry,prepare your freezer bags. I am using bags that you can remove the air from,but regular freezer bags will work just fine.
When your beans have air dried place them into the freezer bags,in meal size portions that are appropriate for your family. For Mr. P and I that is a half cup serving,or one (1) cup of beans per bag.
Thats seven (7) servings of green beans for us to enjoy this winter!
The sources I consulted for this post are as follows:
National Center for Home Food Preservation
How to Freeze Fresh Green Beans
You can find a lot of useful information at the first link,the second one is just how to freeze green beans,but there is also a link to a recipe for lemony green beans there.
Enjoy your week!
Wednesday, August 7, 2013
Polka Dots,churn dash & Nutcrackers too
Although normally those three things have nothing at all in common,they do in this post!
Remember my July finishes post where I said that you would just have to trust that I had fabric cut for a couple Christmas projects? Well last night there was actually a little sewing progress!
The polka dot fabric was purchased last year (I think)at Joanns,the Nutcracker fabric is from a couple years ago,and the white/Holly print has been in my stash since the late nineties!
These batik strips are for another project in progress,which I hope to have finished by Friday night.
Remember my July finishes post where I said that you would just have to trust that I had fabric cut for a couple Christmas projects? Well last night there was actually a little sewing progress!
The polka dot fabric was purchased last year (I think)at Joanns,the Nutcracker fabric is from a couple years ago,and the white/Holly print has been in my stash since the late nineties!
These batik strips are for another project in progress,which I hope to have finished by Friday night.
Monday, August 5, 2013
August ALYOF Goals
After the crazy busy month July was for sewing around here,I decided that this months goals would be countable on one hand! So here are the three items/goals for this month...
All three of the following photos are courtesy of Sew Sweetness Pattern Shop Where I purchased (and you can to) the three bag patterns from.
This first bag is called Aeroplane Bag,because it makes a great travel bag,there are two different sizes included in the pattern. The regular size,and the long size. I have yet to decide which size I will be making.
The second bag is called,Soda Pop Bag (love the name). It features a rounded bottom and also has large grommet windows so you can show off bits of your favorite fabric!
The third pattern I purchased is the Lapin Nori Bag,which you can use either as a long handled tote,or a carry all,because it has not one but two handles!
Now I have to decide on the fabrics...
Linking up with Sew BitterSweet Designs
All three of the following photos are courtesy of Sew Sweetness Pattern Shop Where I purchased (and you can to) the three bag patterns from.
This first bag is called Aeroplane Bag,because it makes a great travel bag,there are two different sizes included in the pattern. The regular size,and the long size. I have yet to decide which size I will be making.
The second bag is called,Soda Pop Bag (love the name). It features a rounded bottom and also has large grommet windows so you can show off bits of your favorite fabric!
The third pattern I purchased is the Lapin Nori Bag,which you can use either as a long handled tote,or a carry all,because it has not one but two handles!
Now I have to decide on the fabrics...
Linking up with Sew BitterSweet Designs
Sunday, August 4, 2013
A little Color Me Retro...
It has been a busy first few days of the month around here,with not much sewing to show for it...
I did have time however to get another pouch sewn up for my partner! Since she is the Silent type and has not said much,I am hoping that she will like this one...because I will be shipping it this next week.
I am so happy that Stephanie over at Quarter Incher put this swap together. It has been so much fun!
Of course I did put my own little twist on the pouch,and changed it up just a bit. You should head over to Flickr and check out all of the Awesome Triple Zip Pouches in this swap,they are amazing!
They say,"All good things must come to an end" and so it is with the first round of Stash Bee. As this is the last month. This month we (in hive #1) were asked to sew the cross/plus block,so here is the one I will be dropping in the mail this week.
A parting shot for you... Mr P. is 5'9 as you can see the sunflower he is standing next to is a good four feet taller. It is even taller than the roof of the trailer! All of the sunflowers in the garden this year are volunteers,they are scattered throughout the garden. Courtesy of the same resident squirrels,who keep depositing the peanuts all over the garden! Of course if one of the neighbors didn't keep them in peanuts...
I will be back tomorrow to post my Goals for the month.
I did have time however to get another pouch sewn up for my partner! Since she is the Silent type and has not said much,I am hoping that she will like this one...because I will be shipping it this next week.
I am so happy that Stephanie over at Quarter Incher put this swap together. It has been so much fun!
Of course I did put my own little twist on the pouch,and changed it up just a bit. You should head over to Flickr and check out all of the Awesome Triple Zip Pouches in this swap,they are amazing!
They say,"All good things must come to an end" and so it is with the first round of Stash Bee. As this is the last month. This month we (in hive #1) were asked to sew the cross/plus block,so here is the one I will be dropping in the mail this week.
A parting shot for you... Mr P. is 5'9 as you can see the sunflower he is standing next to is a good four feet taller. It is even taller than the roof of the trailer! All of the sunflowers in the garden this year are volunteers,they are scattered throughout the garden. Courtesy of the same resident squirrels,who keep depositing the peanuts all over the garden! Of course if one of the neighbors didn't keep them in peanuts...
I will be back tomorrow to post my Goals for the month.
Subscribe to:
Posts (Atom)